Every modern mosque needs a website for the local Muslims in the area to be able to find information about it. Most masjid websites need only a few basic things to be fully functional. But if you take a look at many masajids’ websites, you’ll find that they are missing necessary information, are terribly outdated, or are just plain ugly.
This is a simple guide for mosque webmasters to making a beautiful, modern, easy-to-use masjid website. And since most mosques allocate little money to these things, I’ve focused on the cheapest options available.
Step 1: Decide What Your Website Needs
Ask yourself a simple question: What will local Muslims need to see on your website? This will vary from mosque to mosque, but here are a few basic things that most visitors are likely to be looking for:
- Mosque Address and Contact Information
- Adhan/Iqamah/Local Prayer Times
- Upcoming Events
- Mosque Information (history, size, facilities etc.)
That’s it. I’m sure that these will cover 95% of visits to any and all mosque websites, yet so many of them fail to deliver this information quickly and easily.
Step 2: Use WordPress, DotNetNuke, Drupal, etc.
So how can you deliver all of the information that visitors need in a quick and easy way? The definite answer is: use a Content Management System. A Content Management System (CMS) is an online software that allows computer novices to create websites that look professionally made in minutes. Most of them offer easy ways to edit and create pages and content, with little to no technical expertise. Some of the most popular CMS’s today are WordPress, DotNetNuke, Drupal, and Joomla . We’ll focus on WordPress on this article but the principles apply to any of the CMS’s listed.
WordPress uses the idea of themes and plugins to allow you to customize your website. A theme is a design that you apply to your website, which effects every page you’ve made. A plugin is an extra bit of software that you install on your website to add some functionality that doesn’t come standard on WordPress. For example, there are plugins for Facebook comments, Twitter feeds, etc. There is also a large number of Islamic plugins that allow you to add salah times, verses from the Quran, or a daily Hadith.
WordPress is not only easy to use and very widely supported, it is also FREE. You just need to pay for a hosting plan at any number of hosting providers that provide WordPress support (GoDaddy, Dreamhost, SiteGround etc.) and you’ll be up and running in no time. Typical hosting plans cost less than $10/month – meaning a year of service should be covered by a day’s worth of donations in most masjids. If this is too much for you, some websites even offer free WordPress installation and hosting (wordpress.com is one of these sites). The downside is that your website will have an address like “masjidnow.wordpress.com” instead of “masjidnow.com”.
Once you choose a hosting service and sign up, follow your hosting company’s WordPress (or Joomla, Drupal, etc.) installation instructions to get the site running.
After the CMS is installed, you can choose a theme to style your website to your liking. I recommend something that is simple and minimal. For WordPress, I like the Blackbird theme that niamasjid.org uses for their website. A theme that is too complicated will be hard to update and difficult for users to find what they are looking for.
Step 3: Add the Absolute Necessities
Let’s review the necessary elements of all mosque websites that were listed at the top of this post:
- Mosque Address and Contact Information
- Adhan/Iqamah/Local Prayer Times
- Upcoming Events
- Mosque Information (history, size, facilities etc.)
This is easy: Your WordPress theme should have support for a ‘subheading’ to put right below the heading (usually the name of your masjid). This is a perfect place for the address and contact information like phone and email.
Below is an example of a mosque website using the Blackbird WordPress theme. The NIA Masjid in New Jersey has a simple but professional look – and the contact information can be found instantly without any need for scanning the page.

- Mosque Address and Contact Information
- Adhan/Iqamah/Local Prayer Times
- Upcoming Events
- Mosque Information (history, size, facilities etc.)
You have a few choices here. Your first option is to use a widget that allows you to put in a small table in your theme’s sidebar. This is the free option which requires you to update the iqamah timings daily (or however often the time of prayer changes at your masjid). Although this is one way to save money on a tight budget, we at MasjidNow don’t recommend this option at all: you’re very likely to forget or procrastinate when it comes to updating the prayer times – and that will cause a lot of angry emails to be sent in your direction.
That’s why we created MasjidNow: to help you manage your masjid’s website and online presence. You can use our service to upload your timings to the MasjidNow website.
If you are using WordPress, you can then install the MasjidNow plugin from your WordPress Control Panel, and you’ll have the adhan and iqamah timings on the front page of your website, automatically updated every day.
Likewise, with any other CMS, you can use our prayer timings embed code to display the adhan and jamaat timings on your site.
The widget also allows users to move back and forth in time so that they can check any date’s adhan timings. This option is not free, but it is inexpensive and gives a good value: The MasjidNow service is $5/month or $50/year, and also provides a lot of other features (including getting those same iqamah timings on Android and iOS devices).
Here is another example of a website that effectively displays iqamah timings in a easy-to-find manner, using MasjidNow:
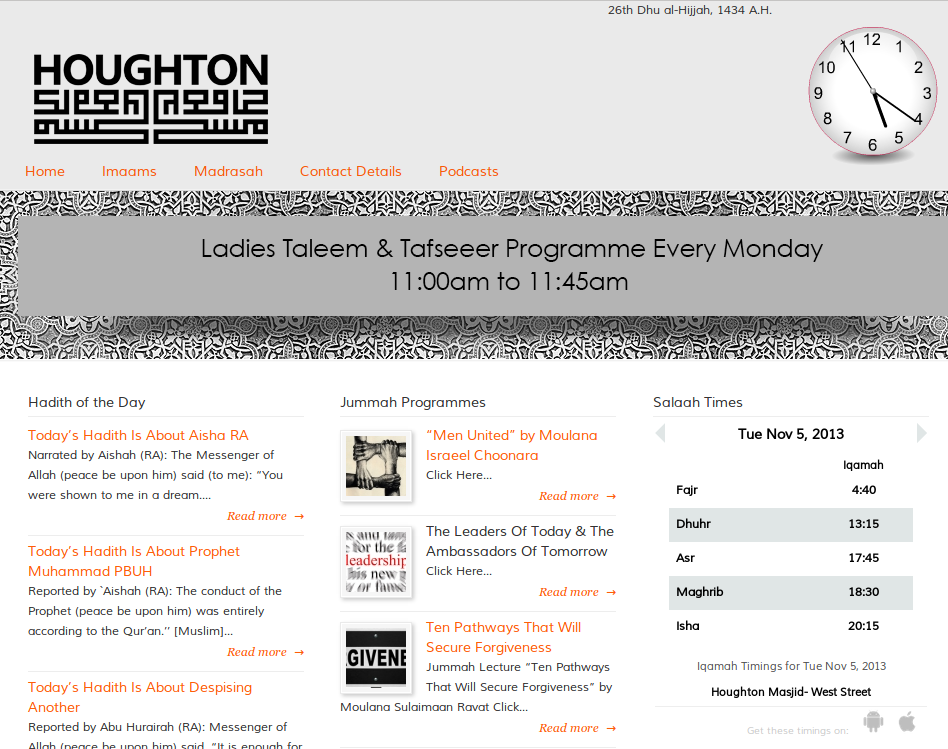
- Mosque Address and Contact Information
- Adhan/Iqamah/Local Prayer Times
- Upcoming Events
- Mosque Information (history, size, facilities etc.)
WordPress Users:
For each upcoming event, create a new Post from your WordPress control panel. Fill in some basic information (who, what, when, where) and it will automatically show up on the front of your website (depending on your theme). This is another example of automating something instead of doing it manually.
Other CMS Users:
Each CMS should have an option of creating a “post” or “article” – this will let you make an article for each event that you can fill in with basic information like who, what, when, and where. You can also set an “expiration” date for the article that will hide the post once the time has passed.
Step 4: Create Additional Pages (optional)
Some additional pages that your users might need are:
- Location/Facility Information (Google Map showing mosque, hours of operation, etc.)
- Mosque Administration (Board of Directors, Imam contact information, membership information)
- Services page (Islamic School, Classes, Counseling)
I want to stress that these types of things are secondary to the above mentioned items. Make sure that you cover the 4 main points above before you start tackling these.
If you decide that you want to create these additional pages, WordPress makes it very easy. Simply login to your WordPress administration page (again, should be located at yourmosquewebsite.com/wp-admin) and click “Pages” on the left hand side, then click “New Page”. Fill in the required fields and click the save button. A link to the page should show up somewhere on your website, usually near the top of the homepage.
That’s it! You can repeat this process for as many pages as possible. Many themes allow pages to be grouped, so that you can, for example, have a link to “Services” that shows “Islamic School”, “Classes”, and “Counseling” page links when you hover over it with the mouse.
I hope you benefited from reading this article, and if you have any questions or comments, leave them in the comments below!
Jazakallah for reading,
Wa salam
MasjidNow
great article